Return To The uStorekeeper Reference Site


This reference page describes the standard page layouts that are included with uStorekeeperTM and how to build templates for your own page layouts.

  1. What Are Page Layouts?
  2. Standard Layouts
  3. Creating Your Own Page Layouts
  4. Additional Rules When Creating Your Own Page Layouts
  5. Example Page Layout Template

1. What Are Page Layouts?

uStorekeeper provides the ability to select and configure the overall layout of your store's category pages. This layout involves specifying where the "view cart" and "place order" buttons are located, where the product data will be located, where the search box will be located, and where a variety of other information will be located on your store's category pages. To specify the layout, you can chose from one of the 4 pre-defined layouts that are illustrated below in the Standard Layouts section, or you can create your own page layout templates as described in the Creating Your Own Page Layouts section.
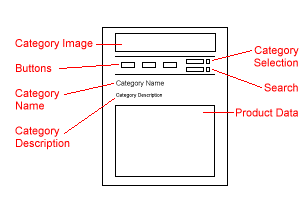
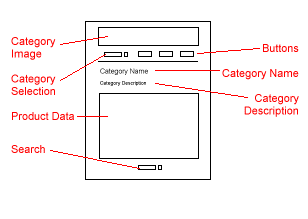
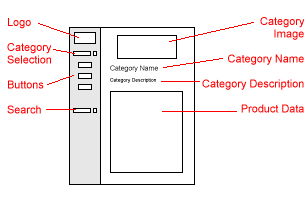

2. Standard Layouts

This section describes the 4 standard layouts that are included with uStorekeeper. For each layout, recommended sizes are given for such things as your store's category, background, and button images. Note that you can specify what layout your store is using and what images your store is using in the "Store Appearance" section of uStorekeeper's General Settings.


USTOREKEEPER1.layout
  • Layout Name: USTOREKEEPER1.layout
  • Category Image Size: 250 x 200 pixels or smaller.
  • Logo Image Size: Not used
  • Button Image Size: 80 x 60 pixels or smaller.
  • Background Image: Any
  • Other Notes: This is the original uStorekeeper layout.


  • USTOREKEEPER2.layout
  • Layout Name: USTOREKEEPER2.layout
  • Category Image Size: 580 x 80 pixels or smaller.
  • Logo Image Size: Not used
  • Button Image Size: 80 x 60 pixels or smaller.
  • Background Image: Any
  • Other Notes: Opens up various possibilities for use of the category image and/or the TOP HTML field.


  • USTOREKEEPER3.layout
  • Layout Name: USTOREKEEPER3.layout
  • Category Image Size: 580 x 80 pixels or smaller.
  • Logo Image Size: Not used
  • Button Image Size: 80 x 60 pixels or smaller.
  • Background Image: Any
  • Other Notes: Similar to the USTOREKEEPER2.layout, but with a thinner top - the search field has been moved to the bottom.


  • USTOREKEEPER4.layout
  • Layout Name: USTOREKEEPER4.layout
  • Category Image Size: 450 x 200 pixels or smaller.
  • Logo Image Size: 175 x 100 pixels or smaller.
  • Button Image Size: 100 x 50 pixels or smaller.
  • Background Image: Backgrounds with a 230 pixel-wide darker color on the left side.
  • Other Notes: Similar to a frame layout.


  • 3. Creating Your Own Page Layouts

    In addition to the standard page layouts described above, you can make your own page layouts. This is done by creating your own HTML page and inserting some special uStorekeeper Tags into the HTML. The easiest way to see how to do this, would be to look at the example.layout file that was included with uStorekeeper. Note how the uStorekeeper Tags have been inserted where the corresponding data should go. Each of the available tags are listed in the table below:

    TIP: When creating your own layout files, it is easiest to start with the example.layout file and then modify/move the uStorekeeper tags around as desired.


    USTOREKEEPER TAG Description
    1 <USTOREKEEPER TAG: CATEGORY NAME> This tag will be replaced by the category's Name.
    2 <USTOREKEEPER TAG: CATEGORY IMAGE> This tag will be replaced by the category's Image.
    3 <USTOREKEEPER TAG: CATEGORY DESCRIPTION> This tag will be replaced by the category's Description text.
    4 <USTOREKEEPER TAG: BACKGROUND IMAGE> This tag will be replaced by the category's background image (if any).
    5 <USTOREKEEPER TAG: TEXT COLOR> This tag will be replaced by the category's background color (if any).
    6 <USTOREKEEPER TAG: CATEGORY GOTO> This tag will be replaced by the Category Selection drop-down menu.
    7 <USTOREKEEPER TAG: CATEGORY SEARCH> This tag will be replaced by the Keyword Search Box.
    8 <USTOREKEEPER TAG: VIEW CART BUTTON> This tag will be replaced by the "View Cart" button.
    9 <USTOREKEEPER TAG: PLACE ORDER BUTTON> This tag will be replaced by the "Place Order" button.
    10 <USTOREKEEPER TAG: INFORMATION BUTTON> This tag will be replaced by the "Information" button.
    11 <USTOREKEEPER TAG: TOP HTML> This tag will be replaced by the category's custom TOP HTML.
    12 <USTOREKEEPER TAG: MIDDLE HTML> This tag will be replaced by the category's custom MIDDLE HTML.
    13 <USTOREKEEPER TAG: BOTTOM HTML> This tag will be replaced by the category's custom BOTTOM HTML.
    14 <USTOREKEEPER TAG: LOGO> This tag will be replaced by the your store's logo (specified in question #10 of the ustorekeeper-lib configuration questions). This logo will also be created as a link to the URL that you specified in question #2 of the ustorekeeper-lib configuration questions).
    15 <USTOREKEEPER TAG: PRODUCT DATA> This REQUIRED tag will be replaced by the category's product listings.


    4. Additional Rules When Creating Your Own Page Layouts

    When creating a page layout template for your store, there are a few additional rules to follow:
    1. The name of your layout file must end in ".layout" (For example: HelloWorld.layout or MyStore.layout).

    2. To use a ".layout" file, transfer it in ASCII mode to the "data" directory on your server. uStorekeeper will then show your new layout file as an option in the "Store Appearance" section the next time you press the "General Settings" button on the uStorekeeper Control Panel.

    3. If hardcoding any images into your layout template, you must specify the IMG SRC with the FULL URL of the image. This is because the page will be dynamically displayed by the ustorekeeper script...and thus, requires the FULL URL of the image.

    4. The USTOREKEEPER TAGs described in the previous section are case-sensative so you must use ALL-CAPS. The spaces are required too. So your best bet is to cut-n-paste the tags into your .layout file.

    5. For efficiency, it is recommended that you remove all comments from your layout file when you are finished creating and testing it.