Below is a screen shot of a typical uSignIn message board with six users.
Overview of message board functions
Adding a User
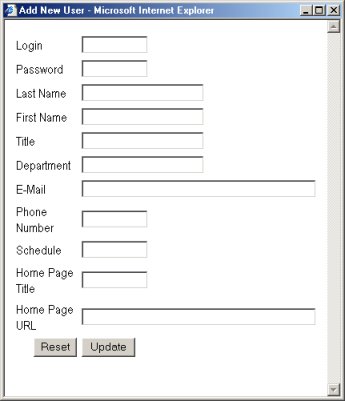
Click on the Admin link (see image above) for Add new user. The following will appear.
Enter all the information for the new user. If the user will have a personal web site, enter the full URL including the http://. The Home page title will be the text displayed to link to the users home page. Press update and the user is added. Use unique login's for each user.Editing User Information
To modify an existing user, click on the users first name on the message board. A table will appear with the existing data displayed and a link called Edit Data. Press the Edit Data link and supply the required password along with the desired changes.
Deleting a User
Click on the Admin Link for Delete a user. Select a user from the resulting list. Each valid user will be listed for you to select from. Once a user is selected, you will be prompted for a password. Enter the user's password or the administrative password that was entered during initial setup. The user will be removed from the system.
All Users - Viewing the Message Board
Who's in, who's out?
Each user has a single row where all information pertaining to that user is displayed. A green or red marker is displayed in the column corresponding the current status of the user. Green means the user in currently IN and red means the user is currently out. There a five possible reasons for a user to be listed out. Check the column heading for the marker's position to determine why the user is out.
When will they be back and did they leave a message?
The last two columns address these questions. The BACK column shows the estimated time of return the user entered when they 'moved' their marker from IN to OUT. The MESSAGE column displays any message the user wanted to leave.
Sorting the Personnel List
The last and first links in the NAME control the sorting of the message board. The last link sorts by last name and the first link sorts by first name. Clicking on one of the sorting links twice will invert the order. The displayed order also depends on the 'grouping' flag controlled by the Status link. When grouping is off, the message board will be sorted by the active sorting link. When grouping is on, the message board will FIRST be grouped by IN status and OUT status and then be sorted by the active link.
Viewing by Department
If you only wish to view members of your department, click on the Admin Link List By Department and select the department you wish to view from the resulting list.
User Status and Messages
Editing user status (moving IN and OUT)
To change your current status, click on your marker. The following dialog box will appear:
Enter your password and select your new status from the list. If you are moving from IN to OUT, leave a message and when you expect to be back. If you are moving from OUT to IN, erase your message and time back. Press update to change your status.Leaving a message for someone
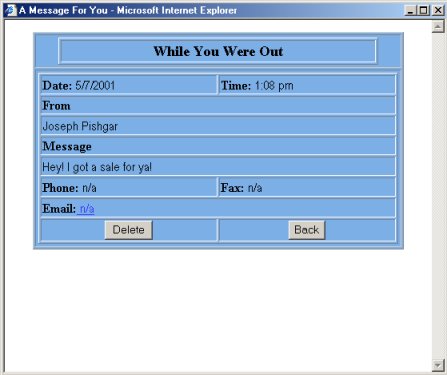
To leave someone a message, click on the Push Pin in the first column. This will bring up the following:
Fill out who the message is from. Also enter any phone, fax or email where the recipient should try to reach you when they return or view their messages.Viewing your messages
When someone has left you a message, a Post-it Note will appear in your row. You can view your messages in two ways. The first is to simply click on the yellow Post-it Note. The second is automatic when you change your status from OUT to IN. Whenever you successfully change your current status to IN, your existing message list will be displayed. Click on any single message link to view the message or delete it. Clicking on a message link will display a note similar to this:
Click on the back button to save this message and return to your message list. Click on the delete button to remove this message and return to your message list.
All information is kept in a text file called usignin.csv. This file contains one record for each user. Included in this file is the current status of the user, their login name and password. This file should only be readable and writable by the user in which cgi programs are run on your server. This is normally the user nobody on Unix web servers.
You may manually edit this file. It is a good idea to also keep a backup in case this file gets lost or corrupted.
When making many changes at once, it may be more efficient to import a copy of the usignin.csv database into a spread sheet. The database is in "PLAIN CSV" format so do not use a comma in any field. Quoted comma's will be interpreted as separated fields. When using ftp to transport the file, make sure the transfer is done in ASCII mode to maintain the proper line ending sequence.
This file should not be manually edited while on a working server because changes that a user makes will not be saved once you save the copy you have open. Instead, make a copy, edit that copy, then replace the original.
There is an administration password that can be used to delete or edit any user. Give this password to the person that will administer this system. They will be able to delete/edit any user from the system without knowing their password. Otherwise, a privileged user can manually edit the database to remove or edit a record. The default password for the administrator is "abcd".
The second file created and used by uSignIn is the message.csv file. This file
holds all saved messages and uses the same 'simple csv' format as described above and
may be manually edited in the same way.
LINKING TO SPECIFIC DEPARTMENTS:
If you have a large amount of listings in the main table, you might want to create links from a main page to individual departments so that employees can view only listings in a certain department. To do this, you can create an HTML page on your site that has links to the usignin script in the following format:
http://your_server.com/cgi-bin/usignin.cgi?dept=DEPT
where DEPT is the department you want to list. Example, from a main html page on your
site, you can have two listings:
To provide a link to a table listing of departments:
http://your_server/cgi-bin/usignin.cgi?cmd=listdept
(This link is also available from the main table.)