
There are two steps required to configure the uShopTM - LinkPoint interface:
Each of these steps is described further below.
STEP 1: Configuring uShop's LinkPoint Payment Option
To configure uShop's LinkPoint Payment Option, begin by logging in to the uShopTM Control Panel and pressing the "General Settings" button. Under "General Settings", select the "Payment Options" button and locate the "LinkPoint Payment Option" section as shown in the figure below.
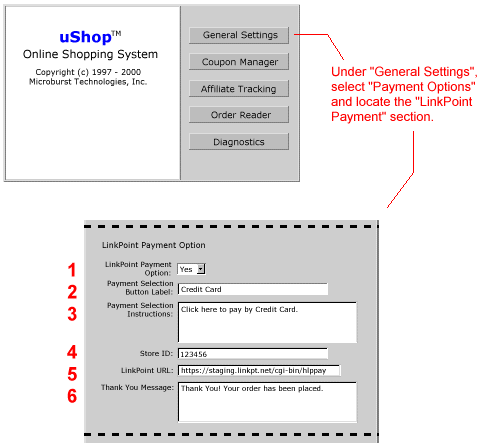
Figure 1: Configuring uShop's Payment Options
Fill in the six "LinkPoint Payment Option" fields listed in that section and described below:
- LinkPoint Payment Option - Set this field to "YES" in order to activate the LinkPoint interface.
- Payment Selection Button Label - In this field, you can specify the label of LinkPoint Payment Selection Button (as it will appear on the "Review Order" page). A typical value for this field is "Credit Card".
- Payment Selection Instructions - In this field, you can specify the set of instructions that will appear next to the LinkPoint Payment Selection Button (as they will appear on the "Review Order" page). A typical value for this field is "Click here to pay by Credit Card".
- Store ID - In this field, specify the 6-digit Store ID that was given to you when you setup your LinkPoint Merchant Account.
- LinkPoint URL - In this field, specify the LinkPoint Processing URL that was given to you when you setup your LinkPoint Merchant Account. The standard value for this field is "https://www.linkpointcentral.com/lpc/servlet/lppay".
- Thank You Message - In this field, you can specify the message that will be displayed on the final "Thank You" page (after LinkPoint has transferred back to the uShop CGI Script on your server). A typical value for this field is "Thank you! Your order has been placed."
STEP 2: Configuring LinkPoint's Merchant Account Form
To configure LinkPoint's Merchant Account Form, begin by logging in to LinkPoint and configuring the fourteen fields on the LinkPoint Merchant Account Setup form as shown in Figure 2 and described below.
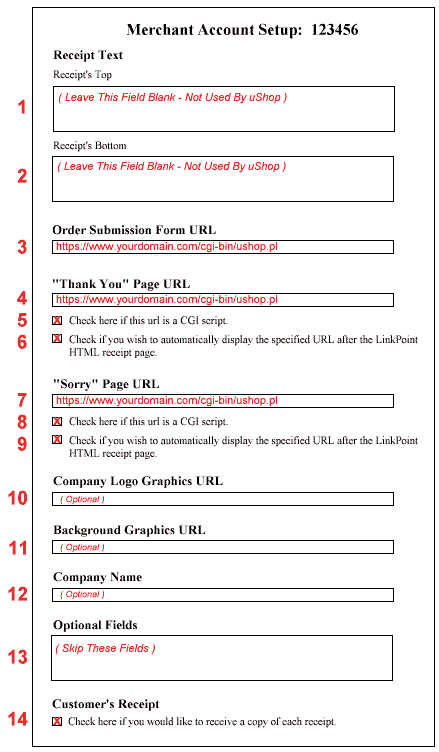
Figure 2: Configuring LinkPoint's Merchant Account Form
- Receipt's Top - Leave this field blank. It is not used by uShopTM.
- Receipt's Bottom - Leave this field blank. It is not used by uShopTM.
- Order Submission Form URL - In this field, specify the full URL of the uShop CGI Script (ushop.pl) on your secure server. (This should be the same secure URL that you use to "Login" to uShop's Control Panel).
- "Thank You" Page URL - In this field, specify the full URL of the uShop CGI Script (ushop.pl) on your secure server. (This should be the same secure URL that you use to "Login" to uShop's Control Panel - The same URL specified above.)
- Check here if this URL is a CGI Script - Yes. Check this checkbox.
- Check if you wish to automatically display the specified URL - Yes. Check this checkbox.
- "Sorry" Page URL - In this field, specify the full URL of the uShop CGI Script (ushop.pl) on your secure server. (This should be the same secure URL that you use to "Login" to uShop's Control Panel - The same URL specified above.)
- Check here if this URL is a CGI Script - Yes. Check this checkbox.
- Check if you wish to automatically display the specified URL - Yes. Check this checkbox.
- Company Logo Graphics URL - This field is optional.
- Background Graphics URL - This field is optional.
- Company Name - Enter your company's name in this field.
- Optional Field - These fields are not used by the uShopTM - LinkPoint Interface.
- Check here if you would like to receive a copy of each receipt. - Check this checkbox if you would like LinkPoint to send a copy of the LinkPoint email receipt to the storeowner. Note that whether you check this checkbox or not, uShopTM will always send the storeowner an email notification of any new orders.
